Execution Result
In the previous section, we wrapped up our overview of VCSSL's syntax and core language features. Technically, that could be the end of this quick-start guide.
But if we stop here, we're basically just saying, "You might as well use C."
So in this section, let's take things a step further by briefly exploring GUI, 2D, and 3D graphics -- all via the standard libraries.
Here's a simple example of how to build a GUI using VCSSL:
import GUI;
// Create a window, a text field, and a button
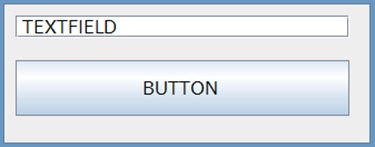
int window = newWindow(0, 0, 350, 180, "WINDOW");
int textField = newTextField(10, 10, 300, 20, "TEXTFIELD");
int button = newButton(10, 50, 300, 50, "BUTTON");
// Mount the text field and button onto the window
mountComponent(textField, window);
mountComponent(button, window);
// Event handler: called when the button is clicked
void onButtonClick(int id, string label) {
string text = getComponentText(textField); // Get text from the field
popup(text); // Show it as a popup
}
Running this will bring up a window with a text field and a button. Clicking the button displays the entered text.
In this code, functions like newWindow and newButton create GUI components.
These functions return "int" values representing ID numbers for the components, which we store in variables like this:
int window = newWindow(0, 0, 350, 180, "WINDOW");
Each GUI element gets a unique ID: Window A might be 0, Window B 1, and so on.
Since VCSSL doesn't support reference types or pointers, all GUI components, 3D models, and other resources are managed internally using these numeric IDs.
Internally, VCSSL currently assigns IDs starting from 0. Unfortunately, that's also the default value of int -- which means that if you forget to initialize an ID variable, it could unintentionally refer to component ID 0, leading to hard-to-trace bugs.
To prevent this, VCSSL allows you to initialize int variables with "NULL", like this:
int window = NULL;  // Safe default

...

window = newWindow(0, 0, 350, 180, "WINDOW");
Assigning NULL to an int sets it to a value that will never be assigned as a valid ID. If you accidentally try to use it, the program will throw a runtime error.
You might wonder, "Why not just start IDs at 1?" Yeah... same here. But for compatibility reasons, this is how it works for now.
Let's take a closer look at the event handler function:
// Event handler: called when the button is clicked
void onButtonClick(int id, string label) {
    string text = getComponentText(textField);  // Get text from field
    popup(text);                                // Show it as a popup
}
This is a standard VCSSL function that gets called when a button is clicked.
But wait -- nowhere in the code did we link this function to the button, right? That's because in VCSSL, any function named onButtonClick with the right signature is automatically treated as a global event handler for all buttons.
In other words, pressing any button will call this function.
To distinguish between buttons, the function's "id" argument tells you which button was pressed:
void onButtonClick(int id, string label) {
    if(id == buttonA) {

        // Code for button A

    }else if(id == buttonB) {

        // Code for button B

    }
}
If you have lots of buttons, this might feel clunky. But if you only have a few, it keeps your code nice and short -- and VCSSL leans toward the latter.
This example only used a text field and a button, but it should give you a good sense of how GUI programming works in VCSSL.
For more details, check out the following resources:
Next up is 2D graphics.
Here's a basic example to get started:
import GUI;
import Graphics;
import Graphics2D;
import graphics2d.Graphics2DFramework;
// Called once at startup
void onStart(int rendererID){
setWindowSize(500, 300); // Set window size
}
// Called repeatedly to render each frame
void onPaint(int rendererID){
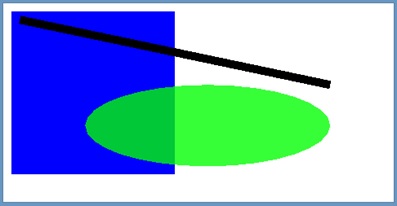
setDrawColor(rendererID, 0, 0, 255, 255); // Set color (blue)
drawRectangle(rendererID, 10, 10, 200, 200, true); // Draw filled rectangle
setDrawColor(rendererID, 0, 255, 0, 200); // Set color (green)
drawEllipse(rendererID, 100, 100, 300, 100, true); // Draw filled ellipse
setDrawColor(rendererID, 0, 0, 0, 255); // Set color (black)
drawLine(rendererID, 20, 20, 400, 100, 10); // Draw line
}
This will display a window showing the shapes as described.
The code above uses a 2D graphics framework to simplify setup. You can see this in the line:
This framework is part of the standard library and helps you:
Of course, if you prefer, you can skip the framework and handle all of this manually.
Let's zoom in on the core drawing logic:
void onPaint(int rendererID){
    setDrawColor(rendererID, 0, 0, 255, 255);           // Set color
    drawRectangle(rendererID, 10, 10, 200, 200, true);  // Draw rectangle

    ...
The "rendererID" argument is the ID of the rendering engine. Like GUI components, rendering engines are managed using int IDs.
(Technically, you can manually create your own rendering engines using newGraphics2DRenderer(), but the framework does that for you and passes the ID into the handler.)
Every drawing function takes this ID as its first argument. That way, if you're managing multiple renderers, you can tell them apart.
Let's add a feature that saves the image when you press the "S" key. Just append this code to the end:
// Save image when "S" key is pressed
void onKeyDown(int id, string key){
    if(key == "S"){
        exportGraphics(getGraphics(), "test.jpg", "JPEG", 100.0);  // Save as JPEG (100%)
    }
}
onKeyDown() is the key press event handler. To save the image, we use the exportGraphics function from the Graphics library.
This function takes a graphics resource ID -- basically a reference to the off-screen buffer. The framework provides this via the getGraphics() function, so we just pass that in.
And that's pretty much how 2D graphics work in VCSSL. For more advanced topics, see the following:
And finally -- we've reached 3D graphics. Here's a basic example:
import GUI;
import Graphics;
import Graphics3D;
import graphics3d.Graphics3DFramework;
// Called once at startup
void onStart(int rendererID){
setWindowSize(800, 600); // Set window size
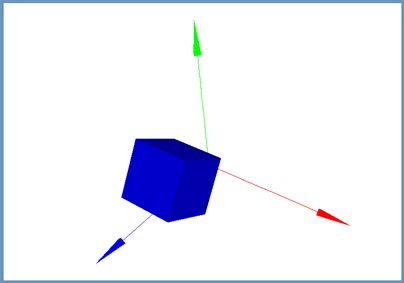
int axis = newAxisModel(3.0, 3.0, 3.0); // Create axis model
mountModel(axis, rendererID); // Attach to renderer
int box = newBoxModel(1.0, 1.0, 1.0); // Create box model
setModelColor(box, 0, 0, 255, 255); // Set color
rotXModel(box, 1.0); // Rotate
moveModel(box, 0.5, 1.0, 1.5); // Translate
mountModel(box, rendererID); // Attach to renderer
}
This produces a simple window with a 3D axis and a blue cube.
Just like in the 2D example, we're using a framework to keep the code short and simple. This framework is part of the standard library, and its structure is mostly the same for both 2D and 3D.
The onStart() function is called once at startup by the framework. It receives the renderer ID, which is used to register models with the 3D engine.
// Called once at startup
void onStart(int rendererID){
    setWindowSize(800, 600);                // Set window size

    int axis = newAxisModel(3.0, 3.0, 3.0); // Create axis model
    mountModel(axis, rendererID);           // Attach to renderer

    int box = newBoxModel(1.0, 1.0, 1.0);   // Create box model
    setModelColor(box, 0, 0, 255, 255);     // Set color
    rotXModel(box, 1.0);                    // Rotate
    moveModel(box, 0.5, 1.0, 1.5);          // Translate
    mountModel(box, rendererID);            // Attach to renderer
}
where:
In 3D, you don't draw shapes directly like in 2D. Instead, you create models (or define polygons), configure their properties, and register them with the rendering engine.
The engine takes care of coordinate transformations, shading, and display. Window management, animation loops, and frame rate handling are also handled by the framework.
To configure a model -- like changing its color or applying transformations -- you just pass in its ID:
    setModelColor(box, 0, 0, 255, 255);    // Set color
    rotXModel(box, 1.0);                   // Rotate
In simulations, you might want to animate a lot of individual polygons directly, rather than using box models. Here's an example that animates a quadrilateral polygon:
import GUI;
import Graphics;
import Graphics3D;
import graphics3d.Graphics3DFramework;
import Math;
int polygon = NULL;
double t = 0.0;
double dt = 0.01;
// Initialization
void onStart(int rendererID){
setWindowSize(800, 600); // Set window size
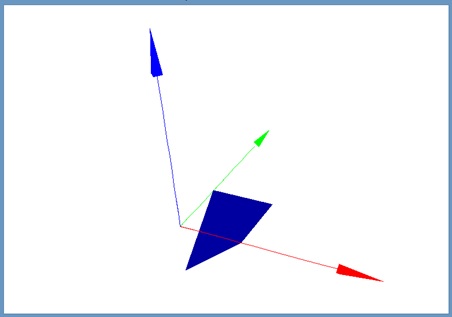
mountModel(newAxisModel(3.0,3.0,3.0), rendererID); // Create an axis model
// Create a quadrilateral polygon (dummy vertices to start)
polygon =newQuadranglePolygon(0.0,0.0,0.0, 0.0,0.0,0.0, 0.0,0.0,0.0, 0.0,0.0,0.0);
setPolygonColor(polygon, 0, 0, 255, 255);
mountPolygon(polygon, rendererID);
}
// Animation update (called repeatedly)
void onUpdate(int rendererID){
t += dt;
// Square vertices
float x0=0.0, y0=0.0, z0=0.0;
float x1=1.0, y1=0.0, z1=0.0;
float x2=1.0, y2=1.0, z2=0.0;
float x3=0.0, y3=1.0, z3=0.0;
// Animate vertex 0
x0=sin(t); y0=cos(t);
// Update polygon vertices
setPolygonVertex(polygon, x0,y0,z0, x1,y1,z1, x2,y2,z2, x3,y3,z3);
}
This creates a square polygon whose top-left vertex (x0, y0) moves in a circle.
Notice that we didn't have to re-register the polygon with the renderer after updating it. Once a model or polygon is mounted, any transformation or vertex change is automatically reflected in the next frame.
Just a quick heads-up: VCSSL's 3D rendering engine uses Z-sorting and flat shading only.
It's designed to be lightweight and platform-independent, so everything is done on the CPU.
This means fancy 3D games with lots of smooth, realistic models are out of reach. Expect a performance ceiling of around a few hundred thousand polygons per second.
That said, it's still usable for scientific simulations, educational tools, and light 3D animation.
Just like with 2D, you can save the screen image by pressing the �gS�h key. Add this to the end of your code:
// Save image when "S" key is pressed
void onKeyDown(int id, string key){
    if(key == "S"){
        exportGraphics(getGraphics(), "test.jpg", "JPEG", 100.0);  // Save as JPEG (100%)
    }
}
This uses the exportGraphics() function from the Graphics library. The getGraphics() function provided by the framework returns the renderer's output buffer for you.
And that's a wrap on VCSSL's 3D graphics basics! To learn more, check out the following:
So far, we've covered how to use VCSSL for GUI, 2D, and 3D rendering. Before we wrap up, here's one more useful tip that's worth mentioning.
All of the drawing we've seen so far involved manually rendering basic shapes like points, lines, surfaces, and boxes. This is great for full control and flexibility -- you can build up complex scenes from scratch.
But let's be real: For typical data analysis tasks like these, hand-coding all the rendering logic is tedious:
In practice, this is where graphing software or graphing libraries come in -- they're made for exactly this purpose.
VCSSL actually comes bundled with two specialized graphing applications from the same developer: RINEARN Graph 2D and RINEARN Graph 2D.
These are available as standard libraries, ready to use right from your VCSSL scripts.
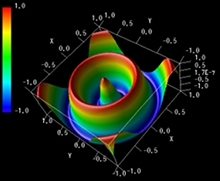
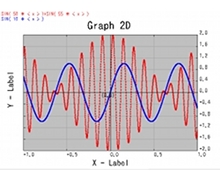

In cases like this, you'll save a lot of time and effort by using these graphing tools instead of building your own rendering logic from scratch.
To learn how to use them from VCSSL, refer to the following guides on the official RINEARN Graph websites:
You can also find plenty of graphing-related code examples in the VCSSL Code Archive:
That wraps up this bonus section.
In the final part of this quick-start guide, we'll cover how to run external code written in other languages from VCSSL.