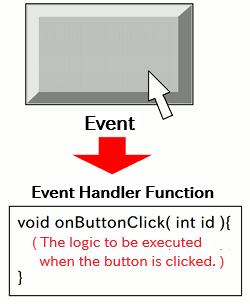
Concept Diagram of Event Handlers
When an event occurs -- such as a button being clicked -- the corresponding event handler function is called.
This page explains how to handle events -- that is, how to respond when a user interacts with GUI components in a VCSSL program.
Up to this point, VCSSL programs have been executed based on a predetermined, linear flow of instructions.
However, in GUI-based programs, actions like clicking a button or moving the mouse require specific responses. Since you can't predict when these actions will happen, you need to shift your mindset from "a fixed flow of instructions" to "reacting to things as they happen."
This is where event-driven programming comes in. VCSSL's GUI system follows a typical event-driven programming model.
An event is something that "happens" and triggers a response. In other words, it's the "something happening" in the phrase: "do something when something happens."
For example, "a user clicks a button" or "the mouse is moved" are both considered events.
When an event occurs, the system automatically calls a specific function in your program to respond to it. These functions are called event handler functions.
You define the contents of event handler functions yourself, so you can write whatever behavior is appropriate for your application.
In VCSSL, event handler functions are recognized automatically based on their function names and parameters, depending on the type of event. You don't need to manually register them anywhere.
All event handler functions in VCSSL follow the same general pattern:
Let's take a look at some actual events and how to define handler functions for them.
To handle events related to windows, you define the following event handler functions:
| Function Name | Arguments | Triggered When... |
| onWindowOpen | int id | The window is opened |
| onWindowClose | int id | The window is closed |
| onWindowMove | int id, int x, int y |
The window is moved |
| onWindowResize | int id, int width, int height |
The window is resized |
| onWindowShow | int id | The window is shown |
| onWindowHide | int id | The window is hidden |
Arguments:
Among these, the "onWindowClose" function is particularly important. Inside this function, if you call the exit() function, you can implement the common behavior of "exit the program when the window is closed."
Previously, VCSSL programs could only be terminated by manually closing the VCSSL console. But if you add this logic, the program can exit automatically when the window is closed -- making the console unnecessary. In that case, you can simply hide it with the hide() function.
To handle events related to buttons, define the following function:
| Function Name | Arguments | Triggered When... |
| onButtonClick | int id, string text |
The button is clicked |
Arguments:
To handle events related to select fields, define the following function:
| Function Name | Arguments | Triggered When... |
| onSelectFieldClick | int id, string text |
A selection is made in the select field |
Arguments:
To handle events related to checkboxes, define the following function:
| Function Name | Arguments | Triggered When... |
| onCheckBoxClick | int id, bool state |
The checkbox is clicked |
Arguments:
When the user presses a keyboard key while interacting with a GUI component, a key event occurs.
Note:
Be careful about which GUI component the key event is triggered on.
For example, if a window contains text fields or other components that accept keyboard input, key events will be prioritized on those components.
In such cases, if you try to detect a key event on a neighboring graphics label or similar component, the event may not be captured correctly.
Similarly, if the window contains buttons or components that respond to specific keys (like the Enter key), other components might not receive those key events.
Therefore, if you want to use key events on a component like a text label or graphics label -- which normally doesn't accept keyboard input -- it is recommended not to place text-input components or buttons on the same window.
To handle key events, use the following event handler functions:
| Function Name | Arguments | Triggered When... |
| onKeyDown | int id, string key |
A key is pressed |
| onKeyDown | int id, int keyCode |
A key is pressed |
| onKeyUp | iint id, string key |
A key is released |
| onKeyUp | iint id, int keyCode |
A key is released |
Arguments:
VCSSL provides both "string" and "int" variants of these handlers:
| Key Label | Constant | Key Label | Constant |
| A - Z | KEY_A - KEY_Z | 0 - 9 | KEY_0 - KEY_9 |
| F1 - F12 | KEY_F1 - KEY_F12 | @ | KEY_AT |
| / | KEY_SLASH | ||
| ENTER | KEY_ENTER | + | KEY_PLUS |
| SPACE | KEY_SPACE | - | KEY_MINUS |
| TAB | KEY_TAB | , | KEY_COMMA |
| SHIFT | KEY_SHIFT | . | KEY_PERIOD |
| CONTROL | KEY_CONTROL | ALT | KEY_ALT |
| ; | KEY_SEMICOLON | [ | KEY_LEFT_SQUARE_BRACKET |
| ^ | KEY_CIRCUMFLEX | ] | KEY_RIGHT_SQUARE_BRACKET |
| UP | KEY_UP | DOWN | KEY_DOWN |
| LEFT | KEY_LEFT | RIGHT | KEY_RIGHT |
Mouse events occur when the user interacts with a GUI component using the mouse -- by moving the cursor, clicking, dragging, or scrolling.
Since mouse interaction includes many types of actions, a variety of event handler functions are provided:
| Function Name | Arguments | Triggered When... |
| onMouseOver | int id, int x, int y |
The mouse enters the component area |
| onMouseOut | int id, int x, int y |
The mouse leaves the component area |
| onMouseMove | iint id, int x, int y |
The mouse moves within the component area |
| onMouseCkick | int id, int x, int y, int button, int count |
A mouse click occurs (quick press-and-release) |
| onMouseDown | int id, int x, int y, int button |
A mouse button is pressed |
| onMouseUp | int id, int x, int y, int button |
A mouse button is released |
| onMouseDrag | int id, int x, int y, int button |
The mouse is dragged with a button held down |
| onMouseScroll | int id, int degree |
The mouse wheel is scrolled |
Arguments:
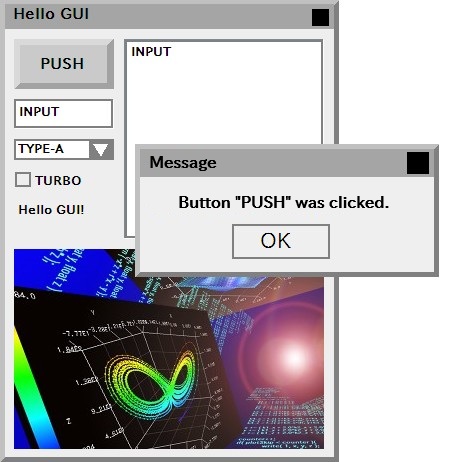
Let's try using various event handler functions in an actual code. Type the code below and run it to see how it works:
import GUI ;
import Graphics ;
// =============================================
// GUI Component Setup - Start
// =============================================
// Create a window at (x, y) = (300, 20) with width 360 and height 480
int windowID = newWindow( 300, 20, 360, 480, "Hello GUI" ) ;
// Create a button at (10, 10) with width 100 and height 50
int buttonID = newButton ( 10, 10, 100, 50, "PUSH" ) ;
mountComponent( buttonID, windowID ) ;
// Create a text field at (10, 70) with size 100 �~ 30
int textFieldD = newTextField( 10, 70, 100, 30, "INPUT" ) ;
mountComponent( textFieldD, windowID ) ;
// Create a text area at (120, 10) with size 200 �~ 200
int textAreaID = newTextArea( 120, 10, 200, 200, "INPUT" ) ;
mountComponent( textAreaID, windowID ) ;
// Create a select field at (10, 110) with size 100 �~ 20
string text[ 3 ] ;
text[ 0 ] = "TYPE-A";
text[ 1 ] = "TYPE-B";
text[ 2 ] = "TYPE-C";
int selectFieldID = newSelectField( 10, 110, 100, 20, text ) ;
mountComponent( selectFieldID, windowID ) ;
// Create a checkbox at (10, 140) with size 100 �~ 20
int checkBoxID = newCheckBox( 10, 140, 100, 20, "TURBO", true ) ;
mountComponent( checkBoxID, windowID ) ;
// Create a text label at (10, 170) with size 100 �~ 20
int textLabelID = newTextLabel( 10, 170, 100, 20, "Hello GUI ! " ) ;
mountComponent( textLabelID, windowID ) ;
// Load an image file named "Test.png"
int graphicsID = newGraphics( "Test.png" ) ;
// Create an image label at (10, 220) with size 310 �~ 200
int imageLabelID = newImageLabel( 10, 220, 310, 200, graphicsID ) ;
mountComponent( imageLabelID, windowID ) ;
// =============================================
// GUI Component Setup - End
// =============================================
// =============================================
// Event Handlers - Start
// =============================================
// Called when the window is closed
void onWindowClose( int id ){
alert( "The program will now exit." ) ;
exit( );
}
// Called when the button is clicked
void onButtonClick( int id, string text ){
alert( "Button \"" + text + "\" was clicked." ) ;
}
// Called when a select field option is selected
void onSelectFieldClick( int id, string text ){
alert( "\"" + text + "\" was selected." ) ;
}
// Called when the checkbox is toggled
void onCheckBoxClick( int id, bool state ){
alert( "Checkbox state changed to: " + state ) ;
}
// Called when the mouse is dragged
void onMouseDrag( int id, int x, int y, int button ){
// Check which component was dragged
if( id == imageLabelID ){
// Check which mouse button was used
if( button == MOUSE_RIGHT ){
println( "Right drag - X=" + x + " Y=" + y ) ;
}else if( button == MOUSE_LEFT ){
println( "Left drag - X=" + x + " Y=" + y ) ;
}
}
}
// Called when the mouse is clicked
void onMouseClick( int id, int x, int y, int button, int count ){
// Check which component was clicked
if( id == imageLabelID ){
// Check which mouse button was used
if( button == MOUSE_RIGHT ){
println( "Right click - X=" + x + " Y=" + y ) ;
}else if( button == MOUSE_LEFT ){
println( "Left click - X=" + x + " Y=" + y ) ;
}
// Check whether it was a double-click
if( count == MOUSE_DOUBLE ){
alert( "Double-click detected." );
}
}
}
// Called on key press (string-based)
void onKeyDown( int id, string key ){
println( "Key pressed: " + key ) ;
}
// Called on key press (keycode-based)
void onKeyDown( int id, int keyCode ){
if( keyCode == KEY_SPACE ){
alert( "Space key was pressed." ) ;
}
}
// =============================================
// Event Handlers - End
// =============================================
When you run this program, a window will appear with various GUI components placed on it. Interacting with the components will trigger the corresponding event handlers.