Example of a "Window" Component
A window is one type of GUI component. Others include buttons, input fields, and more. These components are combined to form the full user interface.
This section covers how to create and place various types of GUI components -- the building blocks that make up a graphical user interface.
Elements such as windows, buttons, and text fields that make up the visual part of a GUI are collectively referred to as GUI components.
To create a GUI component in a VCSSL program, you use a function in the form of new.... The "..." part is replaced with the specific type of component you want to create -- for example, newWindow, newButton, and so on.
- Function Format -Calling such a function creates the specified GUI component and returns a GUI component ID assigned to it.
A GUI component ID is a unique identifier assigned to each GUI component. It acts like a name that the VCSSL runtime system uses to manage the component internally.
Since these IDs are just numbers and not very descriptive, it's recommended to store them in int variables for easier handling.
GUI components are typically used together in combination. The base of any GUI layout is a window, onto which you can place buttons, labels, input fields, and more -- creating the familiar look of typical GUI software.
To place one GUI component on top of another, use the "mountComponent" function.
- Function Format -This function places one GUI component onto another.
The first argument "childID" is the ID of the component you want to place, and the second argument "parentID" is the ID of the component to place it on.
In other words, this places the "childID" component onto the "parentID" component.
The first component you'll typically create in GUI development is a window. Use the "newWindow" function to create one. It has the following format:
- Function Format -where
Buttons are one of the most commonly used GUI components. To create a button, use the "newButton" function. Its format is:
- Function Format -where

Text fields are single-line input fields used to enter text. They are another core GUI component alongside buttons. Use the newTextField function to create one. It has the following format:
- Function Format -where
Text areas are larger input areas that allow multiple lines of text. Unlike text fields, they are suitable for longer input or displaying paragraphs of text. Use the newTextArea function to create one.
- Function Format -where
When you want users to choose from predefined options -- instead of entering free-form text -- use a select field. To create one, use the newSelectField function.
- Function Format -where
To offer the user a simple ON/OFF option, you can use a checkbox. To create one, call the newCheckBox function, which has the following format:
- Function Format -where
To display static text on the screen, use a text label. You can create one using the newTextLabel function, which has the following format:
- Function Format -where
Next, let's look at how to display graphical content such as images or drawing data on the screen.
To do this, you first need to prepare graphics resource within your VCSSL program. Graphics resource is like a "canvas" where drawings or images can be placed. Although you can create a blank canvas from scratch, here we'll load an image file instead.
To load an image file as graphics data, start by importing the Graphics library, which is one of VCSSL's standard libraries:
The Graphics library provides the foundational features for working with graphics resource in VCSSL. It supports operations such as generating graphics dynamically, loading from image files, and exporting back to image files.
To create graphics resource from an image file, use the "newGraphics" function:
- Function Format -where
This function loads an image file from the specified path and returns a graphics ID, which identifies the graphics resource.
Once the graphics resource is prepared, you can display it on the screen using an **image label** component. To create one, use the "newImageLabel" function:
- Function Format -where
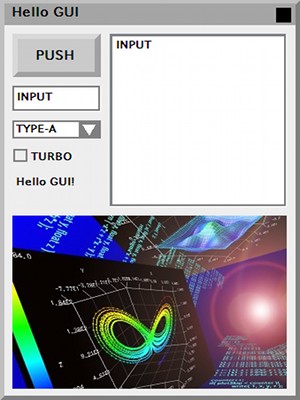
Let's try using all the GUI components we've covered so far in a single program. Write the following code and run it:
import GUI ;
import Graphics ;
// Create a window at (0, 0) with width 360 and height 480
int windowID = newWindow( 0, 0, 360, 480, "Hello GUI" ) ;
// Create a button at (10, 10), size 100Å~50
int buttonID = newButton ( 10, 10, 100, 50, "PUSH" ) ;
mountComponent( buttonID, windowID ) ;
// Create a text field at (10, 70), size 100Å~30
int textFieldD = newTextField( 10, 70, 100, 30, "INPUT" ) ;
mountComponent( textFieldD, windowID ) ;
// Create a text area at (120, 10), size 200Å~200
int textAreaID = newTextArea( 120, 10, 200, 200, "INPUT" ) ;
mountComponent( textAreaID, windowID ) ;
// Create a select field at (10, 110), size 100Å~20
string text[ 3 ] ;
text[ 0 ] = "TYPE-A";
text[ 1 ] = "TYPE-B";
text[ 2 ] = "TYPE-C";
int selectFieldID = newSelectField( 10, 110, 100, 20, text ) ;
mountComponent( selectFieldID, windowID ) ;
// Create a checkbox at (10, 140), size 100Å~20
int checkBoxID = newCheckBox( 10, 140, 100, 20, "TURBO", true ) ;
mountComponent( checkBoxID, windowID ) ;
// Create a text label at (10, 170), size 100Å~20
int textLabelID = newTextLabel( 10, 170, 100, 20, "Hello GUI ! " ) ;
mountComponent( textLabelID, windowID ) ;
// Load an image file named "Test.png"
int graphicsID = newGraphics( "Test.png" ) ;
// Create an image label at (10, 220), size 310Å~200
int imageLabelID = newImageLabel( 10, 220, 310, 200, graphicsID ) ;
mountComponent( imageLabelID, windowID ) ;
When you run this program, a window will appear displaying all the GUI components.