Execution Result
In addition to direct drawing, which we've covered so far, VCSSL also supports a method called sprite-based drawing. This section explains how sprite-based drawing works.
Sprite-based drawing is a software implementation of a feature that was originally implemented in hardware during the golden era of 2D graphics -- especially in games.
Conceptually, it's very similar to the use of animation cels in traditional animation production. Specifically, you register a set of individual "layers" called sprites in the renderer -- one for each shape or image you want to draw. Then, when it's time to render, the renderer composites those sprites together into a single image.
Sprite-based drawing is particularly effective for animation.
For example, imagine an animation scene where some elements move and others stay static. If you were using direct drawing, you'd need to clear the background and redraw everything -- backgrounds, characters, effects -- using draw functions for each frame.
With sprite-based drawing, you can register all the elements as sprites once at the beginning, and then simply update the position or appearance of only the ones that change. This can make your code simpler and more manageable.
Sprite-based drawing is also slightly faster than direct drawing in some cases. However, unless you're drawing tens or hundreds of thousands of sprites, the performance difference on a scripting platform like VCSSL is usually negligible. In practice, just choose whichever method keeps your code cleaner.
Unlike direct drawing, sprites are designed to be manipulated dynamically at runtime -- moved, recolored, and more. So before diving into how to create each sprite type, let's go over the basic operations for using them.
Unlike direct drawing, sprites are designed to be manipulated dynamically at runtime -- moved, recolored, and more. So before diving into how to create each sprite type, let's go over the basic operations for using them.
- Function Format -This function creates a new sprite and returns its unique identifier, known as the sprite ID.
Sprites won't appear on screen unless you register them with a renderer. To register a sprite, use the "mountSprite" function.
- Function Format -Arguments:
Once all the sprites are registered with the renderer, you'll need to actually composite and render them into the graphics resource.
For this, use the "paintGraphics2D" function.
- Function Format -Arguments:
Note: The sprites will not be composited or displayed until this function is called.
VCSSL provides a variety of sprite types: for drawing shapes like lines and polygons, for rendering text, or for displaying images. This section explains how to create and use each type.
All of the functions below return the ID of the newly created sprite.
To create a point sprite, use the "newPointSprite" function.
- Function Format -Arguments:
To create a line sprite, use the "newLineSprite" function.
- Function Fromat -Arguments:
To create a rectangle sprite, use the "newRectangleSprite" function.
- Function Format -Arguments:
To create an ellipse sprite, use the newEllipseSprite function.
- Function Format -Arguments:
The ellipse is drawn to fit inside the specified rectangle.
To create a polygon sprite, use the "newPolygonSprite" function.
- Function Format -Arguments:
To create a polyline sprite, use the "newPolylineSprite" function.
- Function Format -Arguments:
To create a text sprite, use the "newTextSprite" function.
- Function Format -Arguments:
To change the font size used in a text sprite, use the "setSpriteFontSize" function.
- Function Format -Arguments:
The "pt" unit is widely used for font sizing. Typically, 12pt is considered a standard readable size. Fonts around 10pt will appear smaller, while 15pt will look slightly larger.
Note that the exact number of pixels per point can vary depending on the environment. While the difference is usually not dramatic, it's not uncommon for text to shift by a few pixels. For this reason, when placing text within a layout, it's recommended to allow for slight variation in positioning rather than relying on exact pixel-perfect alignment.
To create an image sprite, use the newImageSprite function.
- Function Format -Arguments:
The "graphicsID" can be obtained using "newGraphics(string fileName)" function from the Graphics library to load an image file, or by rendering to another graphics resource using a different renderer.
Let's try using the sprite-related functions covered above. Write and run the following code:
Note: If you're using an image sprite, place a PNG file named Test.png in the same folder as the program before running it. Click here to download the sample image.
import Graphics;
import Graphics2D;
import GUI;

// Create a graphics resource and a renderer
int graphicsID = newGraphics( );
int rendererID = newGraphics2DRenderer( 800, 600, graphicsID );

// Create the display window
int windowID = newWindow( 0, 0, 800, 600, " Hello 2DCG ! " );
int labelID = newImageLabel( 0, 0, 800, 600, graphicsID );
mountComponent( labelID, windowID );

// Set background color to white and clear the screen
setGraphics2DColor( rendererID, 255, 255, 255, 255 );
clearGraphics2D( rendererID );


// =========================
// Drawing section starts here
// =========================


// Create a red line sprite from (0, 0) to (100, 100)
int lineSpriteID = newLineSprite( 0, 0, 100, 100 );
setSpriteColor( lineSpriteID, 255, 0, 0, 255 );
mountSprite( lineSpriteID, rendererID );


// Create a blue filled rectangle at (100, 100), size 500 x 300
int rectSpriteID = newRectangleSprite( 100, 100, 500, 300, true );
setSpriteColor( rectSpriteID, 0, 0, 255, 255 );
mountSprite( rectSpriteID, rendererID );


// Create a green filled ellipse at (100, 100), size 500 x 300
int ovalSpriteID = newEllipseSprite( 100, 100, 500, 300, true );
setSpriteColor( ovalSpriteID, 0, 255, 0, 255 );
mountSprite( ovalSpriteID, rendererID );


// Prepare vertex arrays for polygon and polyline
int x[ 3 ];
x[ 0 ] = 100;
x[ 1 ] = 300;
x[ 2 ] = 300;

int y[ 3 ];
y[ 0 ] = 100;
y[ 1 ] = 100;
y[ 2 ] = 300;


// Create a filled yellow polygon sprite
int pgSpriteID = newPolygonSprite( x, y, true );
setSpriteColor( pgSpriteID, 255, 255, 0, 255 );
mountSprite( pgSpriteID, rendererID );


// Create a red polyline sprite
int plSpriteID = newPolylineSprite( x, y );
setSpriteColor( plSpriteID, 255, 0, 0, 255 );
mountSprite( plSpriteID, rendererID );


// Create a black text sprite at (300, 50)
string text = "ABCDEFGHIJKLMNOPQRSTUVWXYZ";
int txtSpriteID = newTextSprite( 300, 50, 250, 35, text );
setSpriteColor( txtSpriteID, 0, 0, 0, 255 );
setSpriteFontSize( txtSpriteID, 30 );
mountSprite( txtSpriteID, rendererID );


// Load image from "Test.png" and create an image sprite
int graphicsID2 = newGraphics( "Test.png" );
int imSpriteID = newImageSprite( 350, 100, 300, 200, graphicsID2 );
mountSprite( imSpriteID, rendererID );


// =========================
// Drawing section ends here
// =========================


// Render the registered sprites onto the graphics resource
paintGraphics2D( rendererID );

// Render to the display screen
paintComponent( labelID );
paintComponent( windowID );
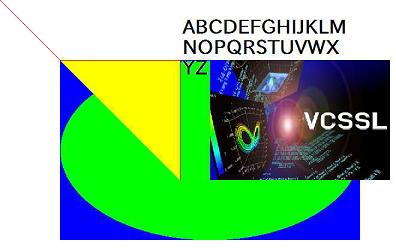
When you run this program, a white window will appear with various shapes and content drawn on it.
Note: The font used for rendering text may vary depending on your environment. If you want to specify a font explicitly, use the "setSpriteFont(int spriteID, string fontName)" function.