[ Prev | Index | Next ]
Japanese English

Direct Drawing

There are two main ways a renderer can draw graphics: direct drawing and sprite-based drawing.

In this section, we'll focus on direct drawing.

Sponsored Link


What Is Direct Drawing?

Direct drawing is a simple method where shapes such as lines and geometric figures are drawn directly onto a graphics resource.

Each time you call a drawing function, the specified shape is drawn immediately on the graphics resource. If it overlaps with existing content, it will be drawn over -- just like using a pen to draw directly on paper.

This method is straightforward, flexible, and easy to understand, making it very convenient. In most cases, 2D graphics in VCSSL will likely be drawn using this direct drawing approach.

However, in cases where many different objects need to move independently (such as in animations), redrawing everything from scratch every frame using direct drawing can become unnecessarily complex. For such cases, sprite-based drawing (covered in a later section) is often more efficient.

Setting the Drawing Color

Before performing direct drawing, you need to set the drawing color. To do this, use the "setDrawColor" function.

- Function Format -
void setDrawColor (
  int rendererID,
  int red, int green, int blue, int alpha
)

Arguments:

  • rendererID: The ID of the renderer.
  • red, green, blue, alpha: The color components for drawing. These values use the RGBA format, and each component should be specified in the range from 0 to 255.

You can call "setDrawColor" whenever you want to change the drawing color. After the call, all direct drawing operations will use the newly set color. Calling it again updates the drawing color for subsequent operations.

What Is RGBA Format?

RGBA stands for Red, Green, Blue, and Alpha -- the three primary colors of light plus a transparency value.

The alpha value controls how transparent the color is: 0 means fully transparent, and higher values increase opacity.

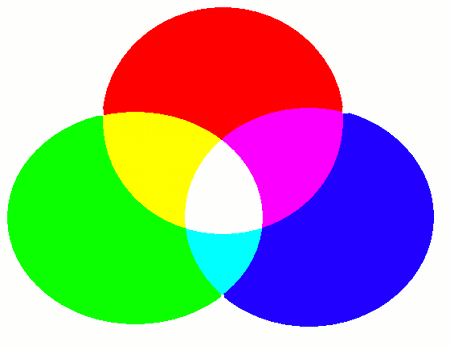
Colors are blended using additive color mixing, which simulates how light behaves -- unlike mixing paints, which uses subtractive blending. For example:

  • (red, green, blue) = (255, 255, 255) produces white, not black.
  • (red, green, blue) = (255, 255, 0) gives yellow.
  • (red, green, blue) = (0, 255, 255) gives cyan.
  • (red, green, blue) = (255, 0, 255) gives magenta.

Drawing Functions

Once the drawing color is set, you can begin drawing shapes onto the graphics resource by calling drawing functions.

These functions instruct the renderer to draw various types of shapes, depending on the one you choose from the list below.

Drawing a Point

To draw a point, use the "drawPoint" function.

- Function Format -
void drawPoint (
  int rendererID,
  int x, int y, int radius
)

Arguments:

  • rendererID: The ID of the renderer.
  • x, y: The coordinates of the point's center.
  • radius: The radius of the point.

Drawing a Line

To draw a line, use the "drawLine" function.

- Function Format -
void drawLine (
  int rendererID,
  int x1, int y1, int x2, int y2
)

Arguments:

  • rendererID: The ID of the renderer.
  • x1, y1: The coordinates of the starting point.
  • x2, y2: The coordinates of the ending point.

Drawing a Rectangle

To draw a rectangle, use the "drawRectangle" function.

- Function Format -
void drawRectangle (
  int rendererID,
  int x, int y, int width, int height
  bool fill
)

Arguments:

  • rendererID: The ID of the renderer.
  • x, y: The coordinates of the top-left corner.
  • width, height: The width and height of the rectangle.
  • fill: Set to true to fill the shape, or false to draw only the border.

Drawing an Ellipse

To draw an ellipse, use the "drawEllipse" function.

- Function Format -
void drawEllipse (
  int rendererID,
  int x, int y, int width, int height
  bool fill
)

Arguments:

  • rendererID: The ID of the renderer.
  • x, y: The coordinates of the top-left corner of the bounding box.
  • width, height: The width and height of the bounding box that encloses the ellipse.
  • fill: Set to true to fill the shape, or false to draw only the border.

Drawing a Polygon

To draw a polygon, use the "drawPolygon" function.

- Function Format -
void drawPolygon (
  int rendererID,
  int x[ ], int y[ ],
  bool fill
)

Arguments:

  • rendererID: The ID of the renderer.
  • x[], y[]: Arrays containing the coordinates of the polygon's vertices.
  • fill: Set to true to fill the shape, or false to draw only the border.

Drawing a Polyline

To draw a polyline (a connected sequence of lines), use the drawPolyline function.

- Function Format -
void drawPolyline (
  int rendererID,
  int x[ ], int y[ ],
  bool fill
)

Arguments:

  • rendererID: The ID of the renderer.
  • x[], y[]: Arrays containing the coordinates of the polyline's vertices.

Drawing Text

To draw text, use the "drawText" function.

- Function Format -
void drawText (
  int rendererID,
  int x, y, int linewidth, int lineheight
)

Arguments:

  • rendererID: The ID of the renderer.
  • x, y: The coordinates of the text's starting point, positioned along the underline. The origin (0, 0) is at the top -- left of the screen, with the X-axis increasing to the right and the Y-axis increasing downward.
  • lineWidth, lineHeight: The maximum width for each line and the spacing between lines. If the text exceeds the specified width, it will automatically wrap to the next line.

Setting the Font Size

To change the font size used for drawing text, use the "setDrawFontSize" function.

- Function Format -
void setDrawFontSize ( int rendererID, int fontSize )

Arguments:

  • rendererID: The ID of the renderer.
  • fontSize: The font size in pt (points), a commonly used unit for text.

The "pt" (point) unit is a standard measurement for font sizes. For on-screen display, around 12pt is considered typical. 10pt will look relatively small, while 15pt will appear slightly larger.

One thing to note: the exact pixel size of 1pt may vary slightly depending on the operating environment. It's common for characters to shift by a few pixels between platforms. So when placing text within a graphics resource, it's best to allow for some flexibility in the layout rather than relying on precise alignment.

Drawing Images

To draw an image, use the "drawImage" function.

- Function Format -
void drawImage (
  int rendererID,
  int x, y, int width, int height
  int graphicsID
)

Arguments:

  • rendererID: The ID of the renderer.
  • x, y: Coordinates of the top-left corner where the image will be drawn.
  • width, height: Size of the image to be drawn.
  • graphicsID: The ID of the graphics resource to draw.

The graphicsID can be obtained by loading an image file using "newGraphics(string fileName)" function from the Graphics library, or by drawing to a different graphics resource using another renderer.

Example Program

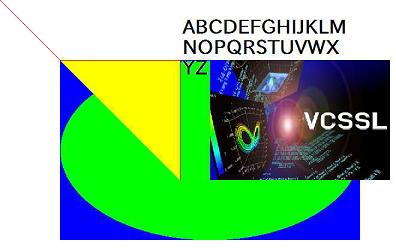
Let's try using the drawing functions we've discussed. Write and run the following program:

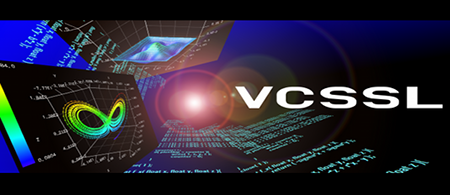
Note: If you're drawing an image, please place a file named Test.png (in PNG format) in the same folder as the program before running it. Click here to download the file.


import Graphics;
import Graphics2D;
import GUI;

// Create a graphics resource and renderer
int graphicsID = newGraphics( );
int rendererID = newGraphics2DRenderer( 800, 600, graphicsID );

// Create the display window
int windowID = newWindow( 0, 0, 800, 600, " Hello 2DCG ! " );
int labelID = newImageLabel( 0, 0, 800, 600, graphicsID );
mountComponent( labelID, windowID );

// Set background to white and clear
setGraphics2DColor( rendererID, 255, 255, 255, 255 );
clearGraphics2D( rendererID );


// =========================
// Drawing section starts here
// =========================


// Draw a red line from (0, 0) to (100, 100)
setDrawColor( rendererID, 255, 0, 0, 255 );
drawLine( rendererID, 0, 0, 100, 100 );


// Draw a filled blue rectangle at (100, 100), size 500 x 300
setDrawColor( rendererID, 0, 0, 255, 255 );
drawRectangle( rendererID, 100, 100, 500, 300, true );


// Draw a filled magenta ellipse at (100, 300), size 300 x 200
setDrawColor( rendererID, 255, 0, 255, 255 );
drawEllipse( rendererID, 100, 300, 300, 200, true );


// Prepare vertex arrays for polygon and polyline
int x[ 3 ];
x[ 0 ] = 100;
x[ 1 ] = 300;
x[ 2 ] = 300;

int y[ 3 ];
y[ 0 ] = 100;
y[ 1 ] = 100;
y[ 2 ] = 300;

// Draw a filled yellow polygon using the vertex arrays
setDrawColor( rendererID, 255, 255, 0, 255 );
drawPolygon( rendererID, x, y, true );


// Draw a red polyline using the same vertex arrays
setDrawColor( rendererID, 255, 0, 0, 255 );
drawPolyline( rendererID, x, y );


// Draw black text at (300, 50)
setDrawFontSize( rendererID, 30 ) ; // Set font size to 30pt
string text = "ABCDEFGHIJKLMNOPQRSTUVWXYZ";
setDrawColor( rendererID, 0, 0, 0, 255 );
drawText( rendererID, 300, 50, 250, 35, text );


// Load and draw an image from "Test.png" at (300, 100)
int testGraphics = newGraphics( "Test.png" );
drawImage( rendererID, 300, 100, 300, 300, testGraphics );


// =========================
// Drawing section ends here
// =========================


// Draw the GUI
paintComponent( labelID );
paintComponent( windowID );
Sample.vcssl

When you run this program, a white window will appear with a variety of shapes drawn on it.

Execution Result
The content drawn using various rendering functions is displayed.

[an error occurred while processing this directive]/en-us/code/archive/0002/1000-doc-2d-draw/download/Draw.zip[an error occurred while processing this directive] [an error occurred while processing this directive]/en-us/code/archive/0002/1000-doc-2d-draw/[an error occurred while processing this directive]

Note: The font used for text may vary depending on your environment. If you want to specify the font explicitly, use the "setDrawFont(string fontName)" function.


Author of This Article

Fumihiro Matsui
[ Founder of RINEARN, Doctor of Science (Physics), Applied Info Tech Engineer ]
Develops VCSSL, RINEARN Graph 3D and more. Also writes guides and articles.

Translation Cooperator

ChatGPT AIs
[ GPT-3.5, 4, 5, 5.1 ]
We greatly appreciate the cooperation of ChatGPT AIs in translating this article.


Sponsored Link


Japanese English
Index
News From RINEARN
* VCSSL is developed by RINEARN.

Exevalatorv2.4Released—MCPSupportAdded,NowUsableasanAICalculationTool
2025-11-15 - We'vereleasedExevalatorv2.4,ourexpression-evaluationlibrary.Startingwiththisversion,itsupportsMCP,makingitusableasacalculationtoolforAIassistants.

Exevalatorv2.3Released—NowUsablefromPython
2025-11-04 - We'vereleasedExevalatorv2.3.Startingwiththisversion,youcannowuseitfromPython!WithgrowingdemandaroundAItooldevelopmentinmind,wesharethedetailshere.

ExevalatorUpdated—EasyJapaneseLocalizationforErrorMessages
2025-10-31 - Exevalator2.2.2isout.YoucannowlocalizeerrormessagestoJapanesewithasimplecopy-and-paste,andwe'veincludedseveralbugfixesandminorparseradjustments.

InsideRINPnOnline:ArchitectureOverview
2025-10-22 - AninsidelookatthearchitectureoftherecentlylaunchedonlineversionoftheRINPnscientificcalculator.It'sopensource,soyoucanfreelymodifyandreuseittobuildyourownwebcalculator(maybe!).

MeetRINPnOnline:UsetheScientificCalculatorAnywhere,Instantly
2025-10-21 - RINPn,thefreescientificcalculator,nowhasanonlineversionyoucanuseinstantlyinyourbrowser—onbothPCandsmartphones.Readtheannouncementfordetails.

TheVCSSLSupportAIisHere!—RequiresaChatGPTPlusAccountforPracticalPerformance
2025-08-19 - AnewAIassistantfortheVCSSLprogramminglanguageisheretoansweryourquestionsandhelpwithcoding.ThisarticleexplainshowtouseitandshowcasesplentyofrealQ&Aandgeneratedcodeexamples.

EnglishDocumentationforOurSoftwareandVCSSLIsNowNearlyComplete
2025-06-30 - We'rehappytoannouncethatthelarge-scaleexpansionofourEnglishdocumentationwiththesupportofAI—aprojectthatbegantwoyearsago—hasnowreacheditsinitialtargetmilestone.

VCSSL3.4.52Released:EnhancedIntegrationwithExternalProgramsandMore
2025-05-25 - Thisupdateintroducesenhancementstotheexternalprogramintegrationfeatures(e.g.,forrunningC-languageexecutables).Severalotherimprovementsandfixesarealsoincluded.Detailsinside.